

Tuesday, April 12, 2011
Monday, April 11, 2011
april stash project :: fabric basket #1

Perhabs I should call it rather scrap project, because only the lining came from my stash, the natural colored fabric was left over from the pincushions I just finished and the rest is just scraps. It was really fun to do. I planned on adding simply colored rectangles in two rows, but didn't plan the colors well, so I cut my finished strip up one more time and added more of the natural fabric. It was a little bit more work, but if I go through the trouble making this basket I at least should like the result. I might even try another one sometime again. It's so simple to make.
Sunday, April 10, 2011
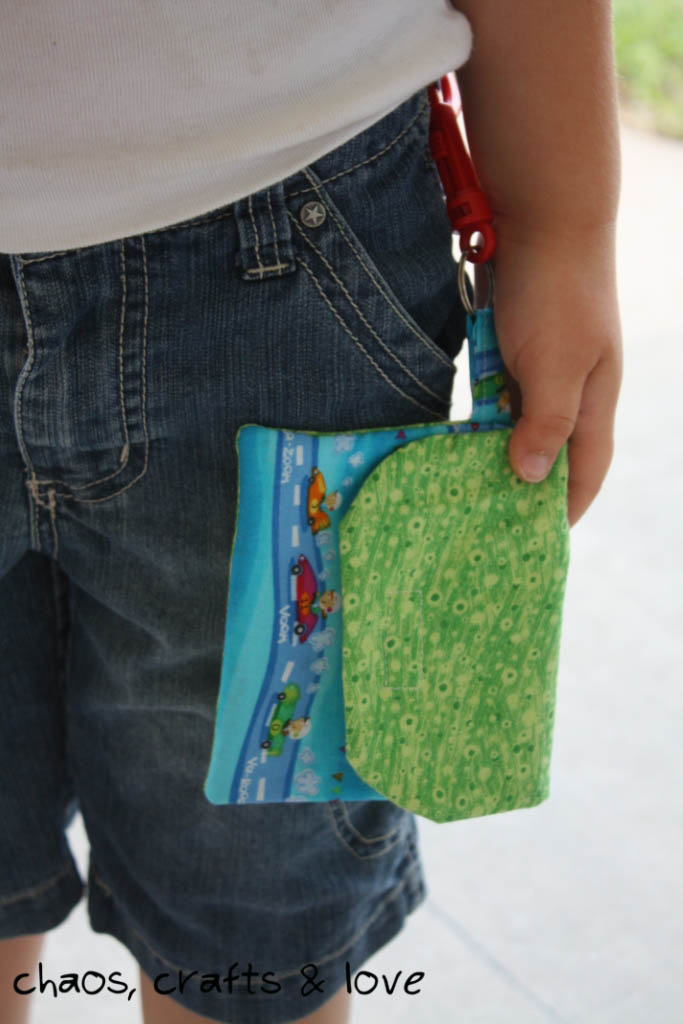
for money and trinkets
It cost Soren a nap to get his hands on it. This was the first attempt to make a little wallet or trinket keeper for him. Since last November my mom and me were looking all over the place to find a simple little boys wallet. With no luck. I had so many in my hands in Germany, we even owned a Pooh Bear one, which got recycled a few years ago when the girls outgrew Pooh Bear. But it is impossible to find a BOY's wallet here.

So a few weeks ago, after another luckless attempt of finding one, I starting on this little project and I admit I am not overly excited about the result. That might be the reason why it took me til today to close up the last opening and add the little bit of velcro.

Soren on the other hand loves it. He loves that it snaps on his pants, if he wears jeans. And I promised him some money for the little wallet, because he insisted putting money in it instead of trinkets for now. He tried and asked for big money, but had to make due with coins. Little sneak.

Until he gets the real wallet from Oma she found, this has to be it, and perhabs someday I can figure out to make one a little neater. It was the first attempt.
You want a little garden update?
Texas has a drought again.
Not really helpful.
My shade building over the veggie plot is not beautiful.
The cucumber plant that almost ripped and miraclously survived looks better as the ones in the veggie plot ?!?!?!

Do you have an idea want plant this might be? We have no clue even we planted it. Smart right.


So a few weeks ago, after another luckless attempt of finding one, I starting on this little project and I admit I am not overly excited about the result. That might be the reason why it took me til today to close up the last opening and add the little bit of velcro.

Soren on the other hand loves it. He loves that it snaps on his pants, if he wears jeans. And I promised him some money for the little wallet, because he insisted putting money in it instead of trinkets for now. He tried and asked for big money, but had to make due with coins. Little sneak.
Until he gets the real wallet from Oma she found, this has to be it, and perhabs someday I can figure out to make one a little neater. It was the first attempt.
You want a little garden update?
Texas has a drought again.
Not really helpful.
My shade building over the veggie plot is not beautiful.
The cucumber plant that almost ripped and miraclously survived looks better as the ones in the veggie plot ?!?!?!

Do you have an idea want plant this might be? We have no clue even we planted it. Smart right.

Saturday, April 9, 2011
a bit of fabric, wire and beads

I always loved necklaces. Simple silver or platin. However these type of necklaces are really thin, and little hands love to hold on tight to them. I didn't want to get them ripped and only wore them occasionally. But I still loved to add a touch of color to a simple shirt with a necklace made of colorful beads or a special charm.

Making these necklace gave me the opportunity to play with beads and wire and of course to add some fabric. Even I love the charm on the first one, I am not sure if #2 is not my favorite indeed.

Here is my litte "I wanna help" person showing up after I already took the pictures perfectly fitting with his chocolate icecream stained soccer shirt.

Wednesday, April 6, 2011
reuse :: recycle :: upcycle
Just a little AddOn to the Disapperaing Four Patch Tutorial:
I admitted to one little mishap at the end of this post, and I really watched out which row of blocks I was cutting last night. However I mixed them up this time on purpose, because I liked the effect of my 'mishap'. I even got everything pressed but didn't see that I flipped the colors by accident on several. I guess it was kind of late. No I did not run for the seam ripper, it was 6 am this morning and my rotary cutter was still out on the counter and I just cut he second row of the block to add on to the bottom and with one more flip everything was back in order.
So truly this is one ABSOLUTELY do NOT stress about this pattern. Just do not cut through the center block you chose and everything will turn out perfectly fine.

Chiara is playing model for this little bag. After all it used to be her pair of jeans she own for less as a year, still would fit perfect. She just added it to the collection of jeans with holes on the knees. So well, I already had it on my list to make a bag for a little someone and the fabric for the lining was already picked out a month or two ago and simply waiting. Jeans came along, movie was playing, scissors were close - ratzfatz - the legs were off. The pants. You know what I meant.

We found the lining at the local quilt store Quiltin' Country in the next town over and in the combination with jeans the colors should fit perfect for a 13 year old. If I can keep the bag from Chiara, because she already has an eye set on it, because it was her pair of jeans. Not going to happen girly.

Aren't the pockets cute? And I didn't even have to make them.
Tuesday, April 5, 2011
tutorial: disappearing four patch
Just a little AddOn right here.
I don't sew many traditional quilt pattern lately, but our church started a little quilting club with a few really extraordinary and sweet ladies. So one of these ladies showed us such an easy way to make a frame blocked out of a simple four patch. I believe it is called the disappearing four patch.

I found the fabric for the center block in a small quilt shop in Southhampton, MA, over five years ago. I collected a few coordinating fabrics for it and planned on using it for the girls before they would outgrow it, but until now, never got to it. The light colors somehow stopped me from using it. After we didn't actually get to try out this technique at the little club last time yet, I just got this special stash of fabric out and played tonight. And truly it's so easy.

Step 1: Cut four squares all the same size. Mine were all 6" squares.

Step 2: Sew the top two squares together and the bottom two squares. Iron them open.

Step 3: Sew the top and the bottom row together to a four patch. Iron open.

Step 4: I choose the yellow square as my middle square, so I measure the row above. My squares were 6", so measure 3" of the top row. You need to measure half of your orginal width.

Step 5: I cut the 3" off I measured in the previous step to sew them back on at bottom.

Step 6: This is how it looks after you add the cut off part back on and turn it 90 degrees.

Step 8: I measure 3" from the top row again to cut off. You need to take half off your orginal width. to add on at the bottom.
That's all it is to do. Have fun with it.
Pssst. Just one hint. Watch out which fabric you do NOT want to cut because I cut once the yellow I did not plan one. Even I like my mishap now, I was not to happy at that moment.
Sunday, April 3, 2011
one sprout
it's tempting to touch every time i walk by. it actually makes me sit down on the front potch. all the little pot with seeds. some with sprouts growing bigger and bigger. some just planted. some no grow at all. and some BRANDNEW. just like this grapefruit seed out one we ate. this one is special. just as special as the lemon one that is just one cm bigger. Both grown out of seeds from fruit we ate and planted. All others didn't show any growth yet. It is just plain AMAZING. amd the best part is I love how amazed my children are about everything from collecting seeds, planting, waiting, seeing what happens and caring. My oldest even talks to the plants because they it makes them grow. Of course it does, if you believe in it and the dog doesn't interfere.

our yard is a long way away from being get away, but it will keep us busy to get there for a long time if we stay where we are. one step at time. And i just need to remember that the result does not always need to count but perhabs the process to get there. the way my children enjoy and learn about nature and recycling. They are looking so much forward to harvest this year, so please wish us some luck for a little harvest for all the effort they are putting in.
Saturday, April 2, 2011

Subscribe to:
Posts (Atom)