Showing posts with label tutorial. Show all posts

Tuesday, April 5, 2011

tutorial: disappearing four patch

Just a little AddOn right here.

I don't sew many traditional quilt pattern lately, but our church started a little quilting club with a few really extraordinary and sweet ladies. So one of these ladies showed us such an easy way to make a frame blocked out of a simple four patch. I believe it is called the disappearing four patch.


I found the fabric for the center block in a small quilt shop in Southhampton, MA, over five years ago. I collected a few coordinating fabrics for it and planned on using it for the girls before they would outgrow it, but until now, never got to it. The light colors somehow stopped me from using it. After we didn't actually get to try out this technique at the little club last time yet, I just got this special stash of fabric out and played tonight. And truly it's so easy.


Step 1: Cut four squares all the same size. Mine were all 6" squares.


Step 2:  Sew the top two squares together and the bottom two squares. Iron them open.


Step 3: Sew the top and the bottom row together to a four patch. Iron open.


Step 4:  I choose the yellow square as my middle square, so I measure the row above. My squares were 6", so measure 3" of the top row. You need to measure half of your orginal width.


Step 5: I cut the 3" off I measured in the previous step to sew them back on at bottom.


Step 6: This is how it looks after you add the cut off part back on and turn it 90 degrees.


Step 8:  I measure 3" from the top row again to cut off. You need to take half off your orginal width. to add on at the bottom.


That's all it is to do. Have fun with it.

Pssst. Just one hint. Watch out which fabric you do NOT want to cut because I cut once the yellow I did not plan one. Even I like my mishap now, I was not to happy at that moment.

Sunday, February 6, 2011

tutorial :: raggedy heart garland :: artsy crafty kids


I have two awesome crafty girls and Chiara truly amazed me on how hard she worked this afternoon. It look like I just purchased a fun fabric choosing heart die-cut machine, because all the shapes were cut out like magic from four little hands.

This project does require the help of a an adult because we used the rotary cutter for cutting strips and the iron  for the paper fusible, but it is a lor of fun using lots of different fabric scraps and lettting the kids choose the placement even if the adult is taking over the fusing.
Materials required to make a little bit raggedy heart garland

paper, cardboard
scissors, pencil
paper fusible
fabric scraps minims size 2"
different beige colored fabrics
 rough string
cutting mat, ruler
rotary cutter, iron (these items should be under an adult's control to keep all fingers safe)
sewing machine


Step 1: Cut a 2" square paper, fold it in half and draw a half a heart shape. Cut it out. Trace the whole heart on cardboard and cut it out to make a template that can be used lots of times.


Step 2: Trace heart on the paper back of the paper fusible. Cut the hearts out leaving a little space around  the line.


Step 3: Pick fun fabric scraps. and let an adult iron the heart shaped fusible onto the wrong side of your colored fabric scraps.


Step 4: Cut the heart along the line out.


Step 5: Now your need to cut out strips in followingn measuremenst out of your beige fabrics. 2.5" x 5" and 2.5" x 8". We used more 5" long strips as 8" long strips, but that is as random as you want and as many as you want. If you use a roatry cutter than this is also an adult's job to keep fingers safe.


Step 6: Fold the strips in half and iron the crease. Take the paper backing off the heart. TIP: Take a needle or the tip of your scissors and scrap the middle of the paper and pull the paper off from the inside towards the outside so you prevent to unravel the edges


Step 7: Place the heart on the folded strip with the open ends pointing down. See placement in the picture in step 6. On a larger strip you can fit two hearts. Iron the hearts onto the fabric. (Adult's help may be required)

Step 8: Choose the flags you want to use for you garland and line them up. Take on at a time, open it and place the strin in between. Close it, pin the bottom exactly on top of each other, so it will stay while you sew. Start on top in the middle and sew straight down to the bottom. DOn't forget to tie it on the bottom and on the top.


Step 9: To give the garland an even more raggedy edge we frayed the edges some more and pulled more threads out on all edges.


Step 10: Now to the hardest part - find a place to hang it up.


Saturday, December 26, 2009

TUTORIAL: Pencil Pouch - Schlamperlmaepple


All you need for making a pencil pouch are two 10"x12" pieces of fabric, iron-on interfacing and one zipper at least 12" long. My zippers are usually at least 14" long. It is easier to work with a little extra on each end. More fabric and embellishments from felt, buttons, ... are optional.

Zum Naehen eines Schlampermaepple braucht man nur zwei Stueck Stoff 10" x 12", aufbuegelbares Interfacing und einen Reissverschluss mindestens 12" lang. Ein bisschen laenger ist vonVorteil, da man damit leichter arbeiten kann. Weiter Stoffe, Filz, Knoepfe ... sind nur extras.

I used Chiara's old jeans for this pouch and so I first had to sew two pieces cut of of the legs to get a large enough piece of material to work with. But I am in recycling mood.

Ich habe eine von Chiaras alten Jeans verwendet und musste somit erstmal zwei kleinere Stuecke zusammennaehen um Stoffstueck zu haben, dass gross genug ist um damit arbeiten zu koennen. Aber momentan ist hier Recycling angesagt.

First you cut your outer pouch fabric in size 10 x 12 inches.

Alles erstes den (Aussen)Stoff fuer das Schlamperlmaepple auf 10x12 inches zuschneiden.


I added another strip of fabric for decoration, with the edges folded in 1/4 " and sewed it on

Ich fuegte einen weiteren Streifen Stoff als Deko hinzu, dazu habe ich die Aussenkanten 1/4" eingeschlagen und auf den Jeansstoff aufgenaeht.


To give the pouch a better form I add some interfacing as stabilizer and cut it the same size 10x12 inches as the pouch fabric.

Damit das Maepple die Form besser Halten kann fuege ich Interfacing als Stabilator hinzu. Das Interfacing auch  10"x12" zuschneiden.


Iron the interfacing onto the back side of the pouch fabric.


Das Interfacing wird auf die linke Seite des Maepplestoffes gebuegelt.


Add the zipper to first top side of the pouch, here the 12" side.
I fold the fabric back and stitch with 1/4" the edge.

Der Reissverschluss wird auf die erste lange (12") Seite genaeht
 und mit einer 1/4" Nahtzugabe abgesteppt.


Repeat this step with the second top side.
For stitching the edge I open the zipper almost all the way.

Diesen Schritt auch mit der zweiten langen Seite wiederholen.
Zum Absteppen des Reissverschlusses auf der zweiten Seite oeffne ich den Reissverschluss fast komplett.

When you are done with adding the zipper it will look like this.

Wenn der Reissverschluss eingenaeht ist, dann sieht es so aus.


Fold the pouch with the zipper in the middle and pin it on both sides.


Das Maepple so falten, dass der Reussverschluss in der Mitte liegt und auf beiden Seiten feststecken.


I usually add a little label right there in the middle or sew a small strip of fabric (about 4 x 1 inches finished size will be folded over). It makes it easier to hold on when opening the pouch with the zipper.

Normalerweise fuege ich ein Label an dieser Stelle auf einer Seite mit hinzu oder einen genaehten Streifen Stoff (ca. 4 x 1 inches fertig, dieser wird dann doppelt gelegt). Dies vereinfacht spaeter das Aufziehen des Reissverschlussen vom Maepple.


I sew with a little bit bigger seam allowance the whole edge closed, but go over the the zipper several times back and forth.

Make sure your zipper is NOT closed all the way when you sew the second side closed.


Rechts und links mit einer Nacht die Seiten schliessen. Ich verwende hier normalerweise eine ein bisschen groessere Nahtzugabe und naehe mehrmals ueber den Reissverschkluss zur Verstaerkung.


Bevor die zweite Seite zugenaeht wird, NICHT vergessen, den Reissverschluss zu oeffnen.


Open the zipper as fas as you can. It will make it easier to fold down the corners into these triangles.
I lay them down on my cutting mat and measure exactly 1" up (height) on the seam and 2" in the width. Pin it and mark it on all four corners.

Der Reissverschluss wird nun so weit geoeffnet wie moeglich. Das vereinfacht das Herunterfalten der Ecken zu Dreiecken. Diese lege ich auf meine Schneidematte und messe ab: 1" an der Nacht in die Hoehe und 2" Breite, das wird festgesteckt und markiert and allen vier Ecken.


Sew on the marked lines and then cut of the tip with a seam allowances.

Es wird auf den Markierungen genaeht und die Ecken mit einer Nahtzugabe abgeschnitten.


 Turn it inside out.

Einfach umdrehen.

For the lining repeat almost all the steps except no interfacing and leave the zipper out. Instead just iron the long edges 1/4" to the left side, because the lining needs to be all the way open. I just pin the lining a little more when closing the sides and also add NO label or fabric strip of course.

Do not turn the lining inside out when done.

Fuer das Futter des Maepple werden fast alle vorhergende Schritte wiederholt. Aber es muss dafuer kein Interfacing verwendet werden und auch kein Reissverschluss, stattdessen einfach die oberen Kanten mit einer Nahtzugabe von 1/4" zur linken Seite umbuegeln, da das Futter komplett offen bleiben muss. Ich stecke das Futter mit mehr Nadeln fest wenn ich die Seiten schliessen und fuege natuerlich kein Label hinzu.


Das Futter bleibt auch links und wird nicht umgedreht.


Just set the lining inside the outer pouch and pin the top to the zipper. Now I sew it by hand with hidden stitches together. Instead of  stitching all the way in the  strip of the zipper I only go through the loops of the seam I made when sewing the zipper in, so you can't see the stitches on the outside.

That's it.

Nun das Futter in das Maepple setzen und nur die obere Kante an den Reissverschluss feststecken. Diese Kante naehe ich nun mit der Hand mit versteckten Stichen fest, gehe dabei am Reissverschluss nur in die Naht , da ich natuerlich nicht moechte, dass man Stiche auf der anderen Seite sehen kann.


Das wars.

Usually I know more expressions in English when I am sewing and quilting, but today I truly was stucked with lots of expressions in German. So I apologize if it sounds confusing. But let me know if there are any more questions.


Sunday, August 23, 2009

Little Birds Tutorial

I keep being asked how I made these little birds, so here you go. I hope this tutorial will show you how easy they are made.
Supplies:
fabric scraps
rice
cross stitching thread
two beads

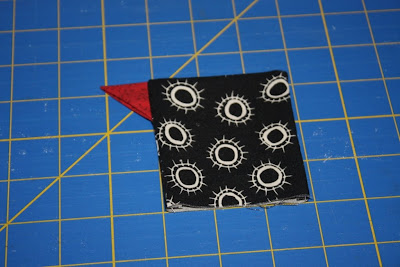
Cut 2 - 3 1/2 " squares for the body and 1 - 2 1/1 " for the beak of the bird.

For the beak you need to fold the small square in half into a rectangle. I used my iron to make every crease hold.
Fold it again into a square. Open the last fold back up.
Fold both sides in as triangles. And one more time over for the finished beak.
For the bird's body take the two big square, lay them right sides together and sew one side closed.


Take the folded beak, open the body squares and lay the beak on the seam pointing the beak to the center.

Fold the top square back down and sew the left and right side closed. NOT the bottom.

It should look like this when you are done.

Turn in inside out.


Before continuing with the bird I fixed the legs. I used cross stitching thread, but anykind of wool ,ribbon or thread you have should work well. I measure about 24 inches 9 times and braided it. To end up with two 5 inches legs.


Now stopped in the pantry to get yourself a snack. You earned it. And while you there. Grab the rice, too.
Fill up the the body with rice, but maximum 3/4, because you still need to be able to sew it closed under your machine.
Fold the raw edge in for about 1/4 inch.

Close it, but the opposite way by positioning the seams on top of each other. And just pin it in the middle once.
Add the legs and pin them in place.
Then just top stitch it closed.
All is left to do, is adding the eyes. I used beads for the eyes. They are a little tiny.

Have fun with them.

p.s. let me know if it sounds confusing somewhere.

LinkWithin

Related Posts Plugin for WordPress, Blogger...