Showing posts with label hearts. Show all posts

Sunday, February 6, 2011

tutorial :: raggedy heart garland :: artsy crafty kids


I have two awesome crafty girls and Chiara truly amazed me on how hard she worked this afternoon. It look like I just purchased a fun fabric choosing heart die-cut machine, because all the shapes were cut out like magic from four little hands.

This project does require the help of a an adult because we used the rotary cutter for cutting strips and the iron  for the paper fusible, but it is a lor of fun using lots of different fabric scraps and lettting the kids choose the placement even if the adult is taking over the fusing.
Materials required to make a little bit raggedy heart garland

paper, cardboard
scissors, pencil
paper fusible
fabric scraps minims size 2"
different beige colored fabrics
 rough string
cutting mat, ruler
rotary cutter, iron (these items should be under an adult's control to keep all fingers safe)
sewing machine


Step 1: Cut a 2" square paper, fold it in half and draw a half a heart shape. Cut it out. Trace the whole heart on cardboard and cut it out to make a template that can be used lots of times.


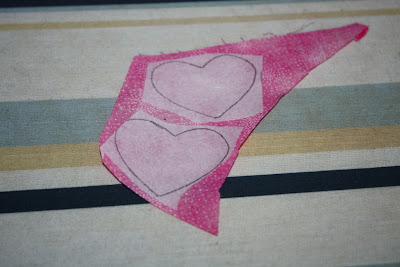
Step 2: Trace heart on the paper back of the paper fusible. Cut the hearts out leaving a little space around  the line.


Step 3: Pick fun fabric scraps. and let an adult iron the heart shaped fusible onto the wrong side of your colored fabric scraps.


Step 4: Cut the heart along the line out.


Step 5: Now your need to cut out strips in followingn measuremenst out of your beige fabrics. 2.5" x 5" and 2.5" x 8". We used more 5" long strips as 8" long strips, but that is as random as you want and as many as you want. If you use a roatry cutter than this is also an adult's job to keep fingers safe.


Step 6: Fold the strips in half and iron the crease. Take the paper backing off the heart. TIP: Take a needle or the tip of your scissors and scrap the middle of the paper and pull the paper off from the inside towards the outside so you prevent to unravel the edges


Step 7: Place the heart on the folded strip with the open ends pointing down. See placement in the picture in step 6. On a larger strip you can fit two hearts. Iron the hearts onto the fabric. (Adult's help may be required)

Step 8: Choose the flags you want to use for you garland and line them up. Take on at a time, open it and place the strin in between. Close it, pin the bottom exactly on top of each other, so it will stay while you sew. Start on top in the middle and sew straight down to the bottom. DOn't forget to tie it on the bottom and on the top.


Step 9: To give the garland an even more raggedy edge we frayed the edges some more and pulled more threads out on all edges.


Step 10: Now to the hardest part - find a place to hang it up.


Wednesday, February 18, 2009

"Crafty Mieschief" Or "one or the other"

It's early when our girls go to the bus in the morning, still dark, so they are days Soren is still sleeping and there are days we crawl back in bed to doze off for a little bit longer. Today was one of those. But Soren wasn't dozing off as long as me and crawled out of my bed and thought he is a "sweetheart" and bringing me breakfast in bed or perhabs was just hungry, because he came back with one of his plastic bowls from the kitchen and set in next to me in bed. A moment later he took my big water glass and tried to fill his bowl with it and dumped it all on me. I was really fast out of bed. Believe me. Walking into the kitchen I find the sugar jar sitting on the floor in the middle of a sugary mess. Thanks, Soren.
So after breakfast with the sun out we went outside. There's enough to do and we took some picture of our papermachee hearts which are finally DONE. Done.
On some we painted the string, on some we didn't and left it natural. A few all red painted hearts we covered with different colored glitter as a little extra. Now we have to see what are going to do with them, after all the work it would be a pity to hide them in a box until next year for Valentines.
Perhabs you find them in you Easter nest again? LOL
Another little birthday present is finished. It is done since a few days, but waited desperately to be filled with crayons. The CRAYON ROLL for a little boy who turns TWO this weekend.


It was so much fun making it that I made two more right away, I just ran out of crayons, because my rolls have 17 instead of 16 slots. One crayon extra. Also I noticed I have a huge stack of fabric, I have no boys fabric besides those two and the frogs are all used up now. But there is more little cowboy fabric perfect for living in Texas.

I hope the little boy will like it as much as I had fun making it.
Do you think the water and sugar incidents were enough mieschief for one day? Then you don't know Soren.
He knows how to open doors since a few days. Fun. More fun he had today whenI changed him in a department store restroom and that stinker locked himself in the stall behind me while I packed my bag again. He and DOORS and LOCKS. Luckily he loves to lock and unlock them, too, because I really did not love the thought crawling underneath the door into the bathroom stall.
Now he is in bed and no more mieschief for today.

Tuesday, February 17, 2009

Hop, hop, hop


What do you say? I actually started early for once. The first EASTER decorations are done on time. That alone is an acomplishment, but the little felt egg shape ornaments with beaded hearts are also not breakable, I didn't say undestroyable for toddler hands, but I am realisitc and know we do NOT need to blow out real eggs for painting and hanging up. The girls would have a little fun and lots of creativity painting and decorating and we would have LOTS of DRAMA and TEARS and BROKEN eggshells. So, that has to wait another couple years or decades.


I just played a little around before and made this little heart ornament out of felt, but I like the egg once more. Those I fill a little with and it gives them some volume.


Here is a photo of the little gift for my secret valentine Jerrica. She received it on Saturday, so now I can show it to you, too. I send her a notebook with a fabric bookcover and of course it had to have hearts on it, it was a Valentine gift exchange.


Saturday, February 14, 2009

a day full of hearts - red, pink, sweet, ...

Just in time we got to hang up our sun catchers at the kitchen window. The girls helped melting red, pink and orange crayons between wax paper with an iron and after letting the paper cool, just simply cut it out. Now we aer out of wax paper (our first roll of wax paper ever. lol)


The girls loved finding their flowers from Daddy in the morning on the table. Next two to little mailboxes with little treats and Soren surprised them with lots of hugs and kisses throughout the morning and a cute little bear for each of them and more hugs.


HAPPY VALENTINE'S DAY!


Do you remember this picture? Yes, we were recycling the Cove Herald and making papermache. At this step just soaking lots and lots of strips and tiny pieces of paper for 2 days in water until it looks like oatmeal and mush.

After expressing all the water out of it and adding white glue in the proportion 1 : 4 to the mix we form hearts out of it. It was very sticky and to a long time to try so eventually I just put it on a low temperature in the oven to speed to process up. After all we had plans to get them done by Valentines Day.


We started painting them while Soren was sleeping and still have some work ahead to see how we are finishing them up.


Saturday, February 7, 2009

Homemade Valentines Cards

Felt is still the big hit in the house, so we came up with an easy idea to use it for making a few valentine cards.


We took some cardstock cut it in half and folded it to cards.

Traced hearts onto felt and cut them out.

Used a few tiny drops of glue to stick them on the card just so they don't slide of right away.

As last step we used the sewing machine to attach the hearts to the card with a straight or zig zag stitch, once or twice ot three times. It doesn't need to be perfectly straight.

After showing the girls the idea Bella can make them all by themselves and Chiara just needs a little help with the sewing machine.


Preview of our next project in progress:

LinkWithin

Related Posts Plugin for WordPress, Blogger...